Thursday, March 29, 2012

Cross Stitch: Owls


Lately, I was not so busy with any major projects.
So I was kind of bored and lazy. Lazy because I also don't want to do anything big.
Maybe this is because of the weather, hehehe. It is just so hot here!

But my mind keeps on urging me that I have to do something worthwhile.

 I have been looking for sewing projects which can be done in one day.
I will only be dealing with it in just a short span of time,
so laziness will not take that urge away.

I was looking at my stash and I found my new collection of embroidery floss, 
the Anchor's Multicolored Floss.
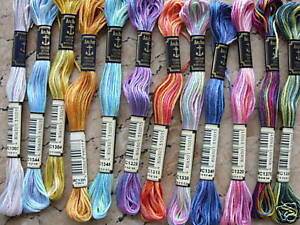
Photo for ebay

Cross Stitching, then came to my mind.
Not much preparations to do. Cut the Aida Cloth, prepare your pattern and sew!

Before we used to buy the patterns, but now it is easy to get a free one in the net.
Thanks to all the generous people who shares their patterns.

I got my pattern from


I made a simpler version (goal: finish in one day! hehehe!), so only the owls. 
And only 6 owls, arranged in 2 rows. Each owl is stitched using different multicolored floss.
The Aida Cloth size is 5"x7". I made it in this size to fit into my empty 5R Photo Frame.


So now it is placed in our dresser!
If ever I will have my own crafting space in our new home, this would be a great decor.


"Time is free, but priceless.
You can't own it, but you can use it.
You can't keep it, but you can spend it.
Once you've lost it you can never get it back."
[ Havey MacKay ]


Wednesday, March 28, 2012

New Laundry Bag


When I was still working in Singapore, one of the favorite places I usually go is Ikea.
I just love to see the designs of their products, yet some are so expensive, some are also affordable.
And our Ikea shopping will not be complete without visiting their restaurant, their Meatballs are so tasty.

I sooooo miss going to Ikea!

Unfortunately, there is no Ikea Store here in the Philippines. Hopefully, in the future, they would consider 
putting a branch here, so Filipinos can enjoy their products too.

One product I bought in Ikea is the JÄLL laundry bag with stand. 

Photo From:

I like it not only because it's cheap, it looks simple and clean.
It can be folded flat and lightweight too.
It was only $5.00 SGD, 4 years ago. 

So after almost half of a decade of using, here's what it looks like now!


The frame is still ok though, the reason that I did not put it away.
For a month, it was just placed in the corner. 
I was  looking for ways on how to re use the frame

Then I saw this:


Ikatbag's Hamper Tutorial
Isn't it cute?

Inspired by her creation, I made a new Laundry bag.
I did not follow how she cut her fabric and I did not put a strip of fabric at the bottom, since our frame is different.

And here it is!


Materials Used:
Katsa Cloth
Black Bias Tape
Black Buttons

I am so happy with my new bag.
And I am hoping it would also last like before!


Monday, March 12, 2012

DIY Bag Tags

Yes, this is still about the Baby Shower! Hehehe :) 
This time, I would like to show you how I made the supposed to be party favors, but was instead became the prizes for the games, since it was only few.
My cousin made baby themed large cookies as party favors. Yummy, yummy!

 { DIY Bag Tags }

Things needed:
Elephant Shaped Foam Stickers
Heart Shaped Foam Stickers
Black Plastic Folder
Beads
Ribbons
Big Needle
Sticker Paper
Scissors
Ruler

Step 1. Prepare foam stickers and plastic folder.
Step 2. Stick the hearts to the elephant.
Step 3. Cut out the Black Plastic Folder - size: 7cm x 5cm and stick the elephant into the plastic.
Step 4. Punch hole.
Step 5. Prepare your ribbons, beads and needle.
Step 6. Put the ribbon into the hole.

Step 7. Insert the ribbon's one end into the big needle, pull.
Step 8. Put the bead, pull.
Step 9. Put the ribbon's other end into the needle, pull.
Step 10. After aligning the ends of the ribbons and putting the bead properly, tie the end of the ribbon.
Step 11. Put the "This Belongs to" Sticker at the back. Write you name, number and address.
Step 12. Tie it into your bag. 

Finished DIY Bag Tags - 20 pcs :)

And if you are planning to make one, here's a giveaway --- "This Belongs to" Sticker !
Download it here ----  "This Belongs to" Sticker PDF

Print in A4 sticker paper (no scaling), cut and stick!
 Enjoy!!!

Monday, March 5, 2012

Diaper Motorcycle

Yesterday afternoon at the Baby Shower we hosted, I made this as my gift to the parents-to-be.

- Diaper Motorcycle -


Contents:

26 pcs. NB Diapers
1 pc. Baby Blanket
4 pcs. Burp Cloths
1 pc. Ribbon Tag Toy
Teddy Bear
Baby Essentials (Powder, Soap, Oil, Cotton Buds & Alcohol)


Credits to SWEETAPRILS for sharing a very nice idea and a very thorough (with large and nice photos too) tutorial. You can see her tutorial here --- http://www.sweetaprils.com/search/label/Diaper%20Motorcycle%20Tutorial

Saturday, March 3, 2012

Easy Baby Blanket Tutorial

My sister , my cousin  and I will be hosting a baby shower tomorrow for our cousin. 
We will be welcoming their Baby Boy to the world whom they have been patiently waiting for 7 years.
And since one of the purpose of Baby Showers is to help parents replenish their supply of baby items, I made a Baby Blanket, which I would like to share to you a tutorial on how to do it. 
I've done some Burp Cloths and a Ribbon Tag Toy since there were extra fabric.

I will be placing these baby things into the Diaper Motorcycle (which I will be posting next time) and these would be my gift to them.

Baby Blanket Tutorial

Step 1. 
Cut out 2 Flannel Fabrics. Printed and Plain Colored. Size is 32"x32". You can have it bigger or smaller.

Step 2.
 Round the corners.

 Step 3.
Face right sides together.

Step 4.
With 1/2" allowance, sew the edges. 

Step 5.
Leave about 5" long not sewn.

Step 6.
Turn inside out.

Step 7.
As close to the edge, sew the part you have not sewn, this time, on the right side.

Step 8.
This is how it would look like when you are done.

Step 9.
Choose a decorative stitch or you can opt for the basic stitch.

Step 10.
Using the decorative stitch and a thread with coordinating color with the printed fabric, sew along the edges.

Step 11.
Back part

Life is not Perfect....and so is my Sewing.
My sewing session is not complete without these happening.. a big thanks to the Seam Ripper!

Finish Baby Blanket

With the extra fabric, I made some Burp Cloths (4 pcs.) and a Ribbon Tag Toy.
The Burp cloths are sewn the same way as Baby Blanket but in a smaller scale.

 Ribbon Tag Toy
The idea came form here:

Happy Sewing!!!